
Are You On a Tight Budget For Your Macro Photography?! Use This Technique!
Many nature photographers overlook insect macro photography in spite of their passion about this interesting filed mostly because of the high expensive equipment they need.
Luckily, there is a cheaper option. I couldn’t personally believe that this technique would work. But, this talented and smart macro photographer reveals an inexpensive gear which you could use to capture amazing insect macro photos.
Read through this great article, check out the images and let us know what you personally use!
If you’re looking for an inexpensive way to achieve high magnification in your photography, you need to know about the reverse lens macro photography technique. Reverse lens macro photography has allowed me to achieve the magnification I couldn’t come close to with my more expensive equipment.
……………….
In 2012, I (spent a lot of money and) purchased the Canon EF 180mm ƒ/3.5L Macro lens. A year later, I (yet again spent a lot of money and) purchased the Canon Macro Twin Lite MT-24EX. I spent years begging my husband to let me buy these two pieces of equipment. With $2,500 in shiny new toys in hand, I was ready to take my macro photography to a whole new level of pure awesomeness.
I loved my new macro setup. The 180mm macro lens was my first professional lens and I could clearly see the difference in the quality of photos I was taking (before the 180mm I was using the Canon 100mm macro lens for most of my work – I still adore that lens).
Unfortunately, my shoulder wasn’t so happy about the new load I was carrying for hours every week. I developed pretty bad tendinitis in my right shoulder (my shooting arm) and I could barely lift my arm let alone my arm plus my camera. I was carrying something like 11 pounds with my camera, the 180mm macro lens, and the macro flash. I ended up taking a break from photography for a while and starting researching new macro techniques. That’s when I came across the reverse lens technique.
Mind blown.
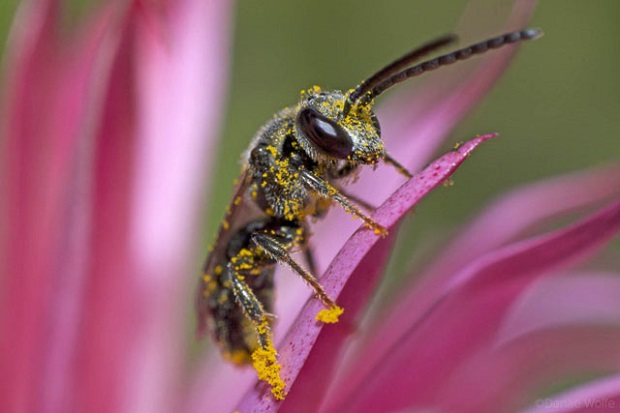
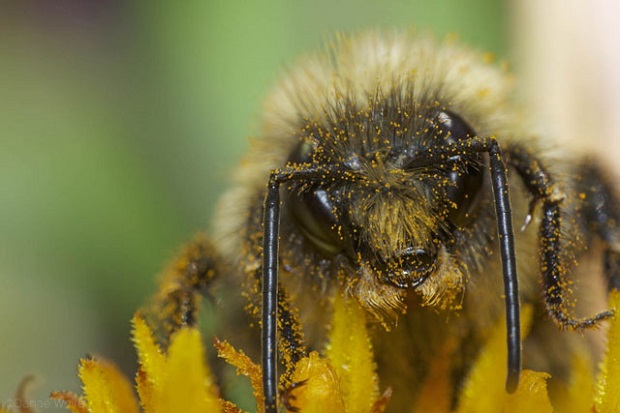
If you’re not sure whether you feel like reading any more, take a look at the photos below. I took those photos with macro setup that cost me about $50 (not including my camera).
What’s the Reverse Lens Technique?
The reverse lens technique is exactly what it sounds like. You mount your lens on your camera backwards (with a special adapter). Sounds crazy, right? With this technique you can achieve high magnification macro photography.
……………….
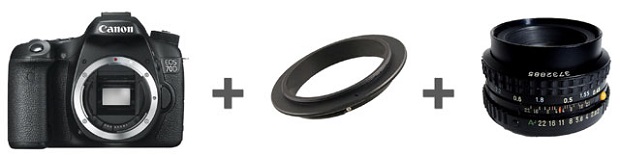
What Equipment is Needed?
For the reverse lens technique, you only need three pieces of equipment: your camera, a prime lens with manual aperture control, and an adapter.
The Lens
A 50mm or 28mm prime lens with a manual aperture ring is your best choice. The wider the angle of the lens, the greater the magnification you’ll achieve when the lens is mounted backwards on the camera. Since the lens will be mounted backwards, you will NOT have electrical connectivity from the lens to camera. Because of this, you will not be able to change your aperture from the camera.
Most modern lenses do not have manual aperture rings, so you’ll probably want to look for something that was produced in the film days (you may have something stored away in a closet that you can use!).
The Adapter
The adapter you’ll need will depend on two things – your camera lens mount and the filter diameter on your lens. For example, I use a Canon 70D with an EF lens mount. The lens I use for my reverse lens photography is a Canon FD 28mm ƒ2.8 with a 55mm filter diameter. The adapter I use is a Canon EOS EF to 55mm filter diameter.
……………….
Read the full article and see all these stunning insect macro photos at: PetaPixel.com

Credits:
Article Source: Shooting Insect Macros on the Cheap with a Reversed Lens
Image Source 1 (Top Featured Image Source)